
Contents
How to Calculate Built-up area?
In this article, we shall look upon the methodology to calculate the built-up area for which the contractor is to be paid otherwise also called a contractor payable area. I have explained this with the help of an example that I had worked out. The method mentioned below is not standard practice and may vary depending on the individual and terms of the contract. The below example is for illustrative purposes only.
This is primarily used to award the contract to the RCC contractor which includes civil works like RCC slab, blockwork/brickwork, internal and external plaster. This area is used to work out the contract value of the civil works. The payment schedule is also decided based on this area.
Built-up area: Built-up area of a property includes carpet area, the area occupied by the external walls, service ducts (inside the property), balconies or sit-outs, etc.
This area is worked out with the help of AutoCAD drawings and is finalized between the client and contractor at the time of awarding the contract.
Follow this article and learn how to calculate built-up area?
Steps involved
1)Identifying the features involved. First, we need to identify the features that we need to take into consideration while calculating the built-up area. These features include flats, basement, stilt, ground floor, podium, staircase, passage, lift shaft, service ducts, refuge area, balconies, flower bed, etc. In general, we do not consider service ducts and shafts in the built-up area which is payable to the contractor as they are not covered at the top.
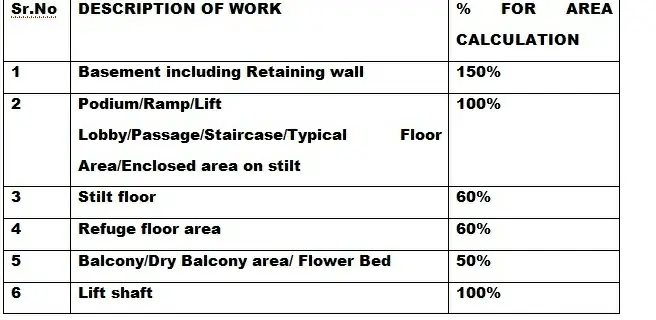
2) Mode of measurement: Mode of measurement is finalized between the contractor and the client. There is no standard model of measurement available. This is decided as per mutual understanding between both parties. It can help us to determine how much percentage of the area needs to be considered for various features. Given below is the example of a mode of measurement.
3) Identify the drawings for each feature as per the mode of measurement.
4) Set the unit in metres as calculation in metres and sq. metres is convenient.
5) Draw separate Polyline (PL) for separate features with different colors to differentiate easily.
5) Prepare an excel sheet of the area statement showing the detailed area of each feature. Also an excel sheet makes the calculations easy.
6) One point which needs to be kept in mind while BUA calculation is that we need to consider only features that are enclosed and covered on top. This is the reason that many times the terrace or roof slab is not considered in BUA calculations. However, this too depends on the client and the contractor. The example which I have considered had an arrangement in which the projections above 600 mm from the building line were 100% payable. Hence the projections on roof slab have also been considered for calculations.
Now let us have a look at how the built-up area is calculated. For this example, I have considered a building with configuration as Basement + Stilt floor + 32 floors + Fitness center. First, we shall identify the different features involved and then run a polyline along the boundary of each feature and determine their areas. After that, we will prepare an excel sheet and calculate the area of each feature as per the mode of measurement.
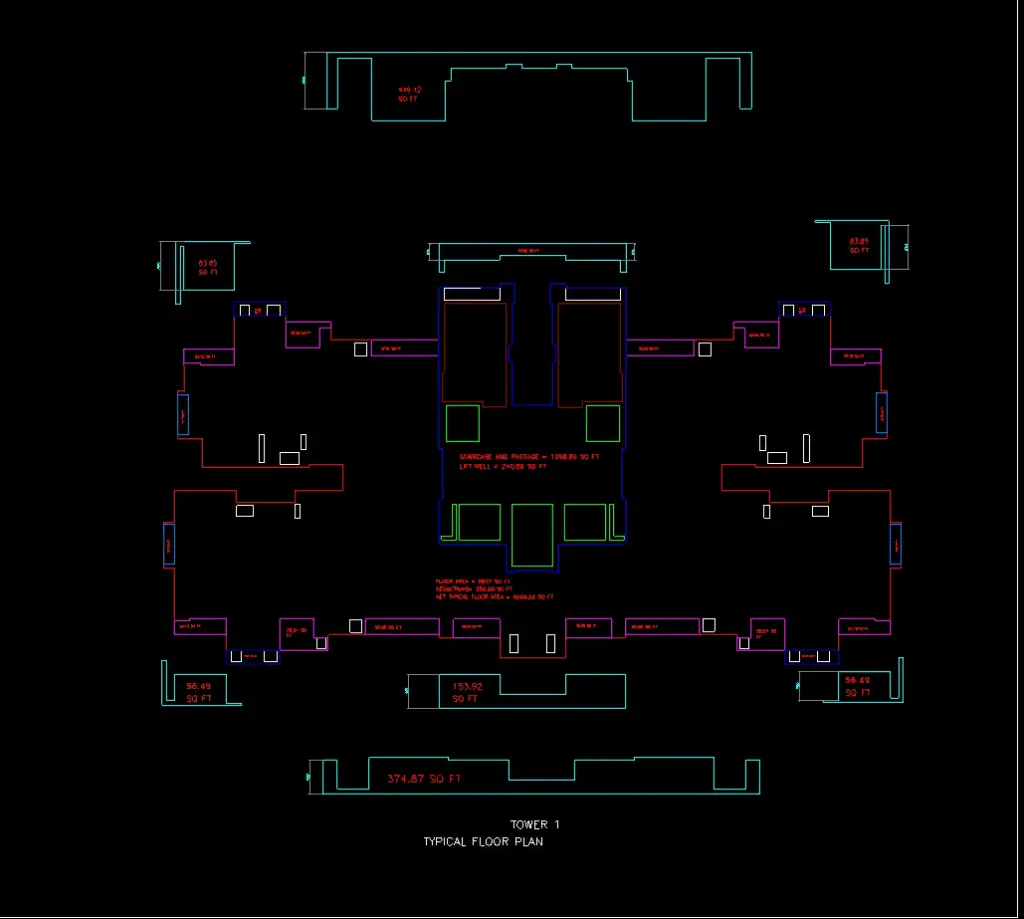
1) Typical floor.
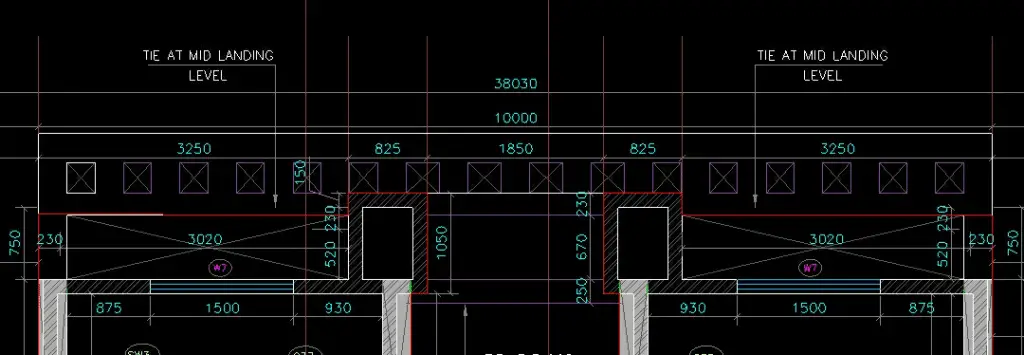
First, we need to open AutoCAD. Then go-to File command, then opens command, select the path in which the typical floor plan of the building is saved. The area should be calculated using an architectural plan only as this drawing gives us precise dimensions. Other drawings may not be to the scale. After opening the plan, type polyline or PL in the command tab.
Then select the starting point from where the polyline is to be drawn. Run the PL along the periphery of the building. This should be done with the utmost care and precision as any slight error in drawing PL may result in a cumulative error while calculating the whole area. After the PL is drawn, assign a specific color to it.
Then select the PL. Type copy in the command tab. Select a base point on the PL. You can also copy the PL by selecting and then pressing CTRL+C. Then give the paste command by pressing CTRL+V. Drag and drop the PL beside the original plan. Select the PL and type LI in the command tab. This will open the properties of the PL such as length and area. From this, we can get the area of the typical floor.

2) Basement and Stilt level.
Repeat the same procedure for the basement and stilt level. Run the PL along the building footprint on these 2 levels and by checking the properties of the PL we can determine the area at these levels.
3)Refuge area
On the refuge floor, the same procedure will be repeated. The only difference is that we need to run an additional PL outside the refuge area or refuge flat because it is not considered 100% while calculations.
4) Upper terrace
In this plan there is a gym, multipurpose hall and lift lobby. So as these features are covered at the top so we need to take these areas into consideration as well.
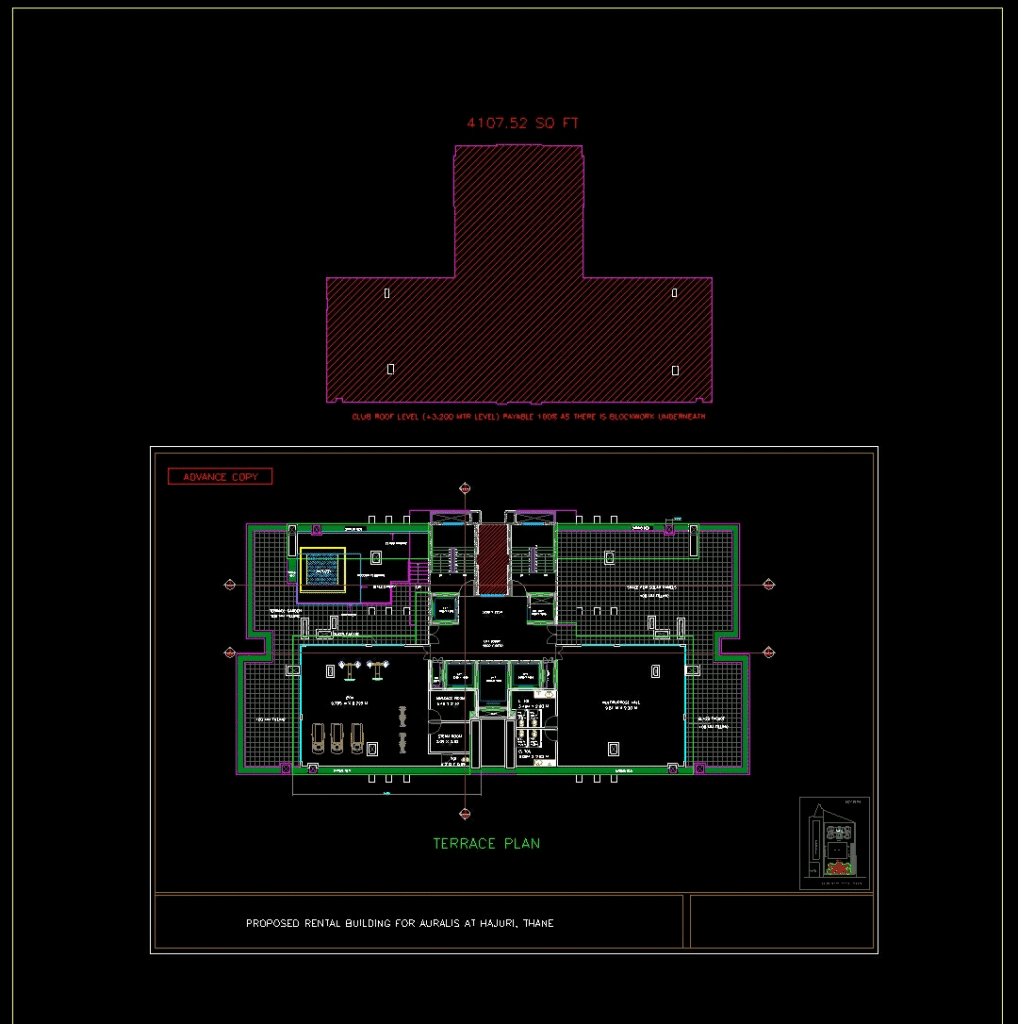
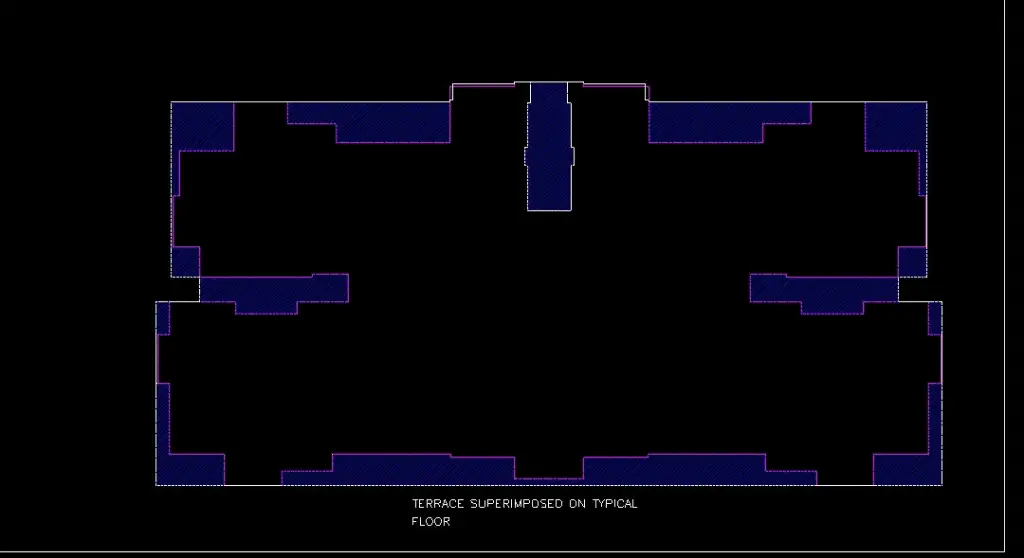
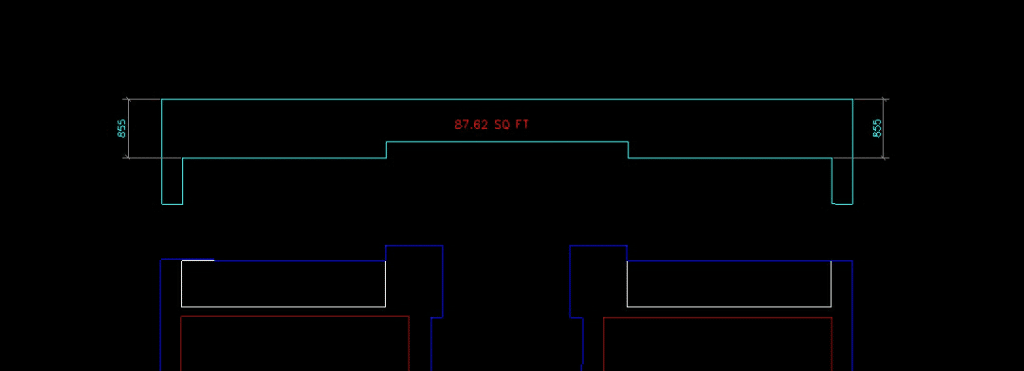
5) Terrace projections.
In this particular contract projections above 600 mm from the building, lines are to be considered for 100% payment. So we will not take the entire terrace level. In this step, we run a PL along the periphery of the terrace level. We then copy the PL and drag and drop it beside the original drawing. Then superimpose the terrace PL on the typical floor PL. Identify the areas which exceed the building line. If the area is above 600 mm hatch it with a different color. Then run a PL along the boundary of that area and from the properties determine the area of the region. Only this area will be taken into consideration.
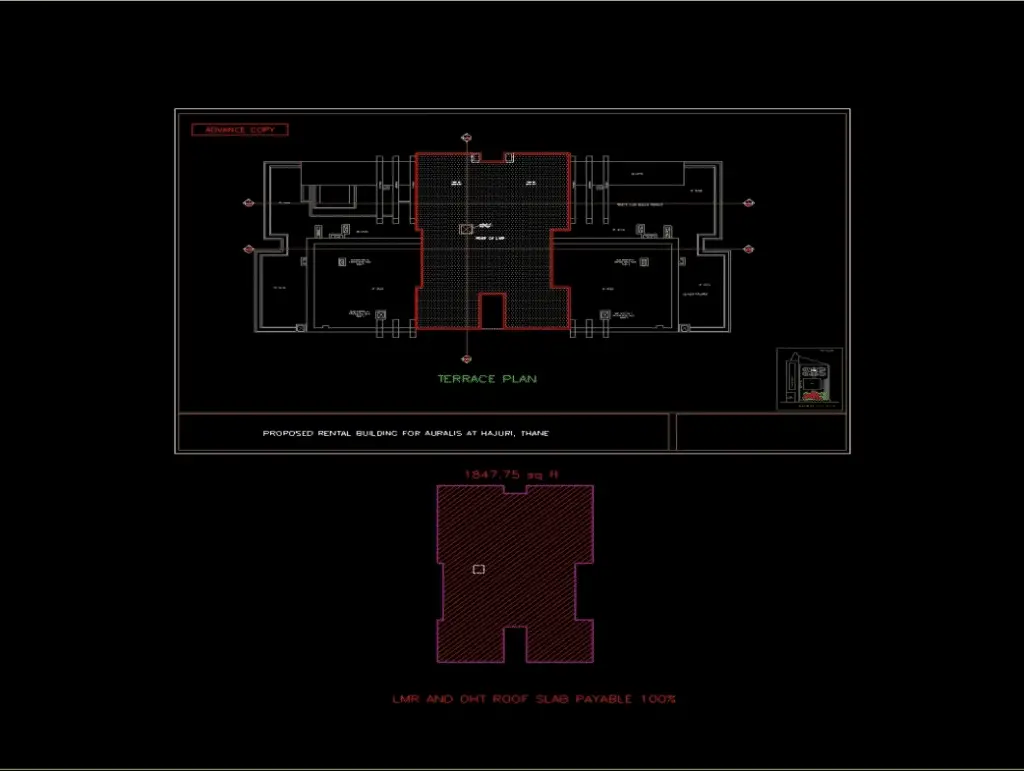
6) Lift Machine Room (LMR) and Overhead Tank (OHT)
In this example, the LMR and OHT lie above the upper terrace. As these features are too covered on top we will consider them for calculations.
7) Balconies/Flower beds
In this contract balconies, flower beds, etc are to be considered for 50% payment. So we need to run a PL along all the balconies and determine their areas separately. Then we deduct 50% area from the
typical floor area.
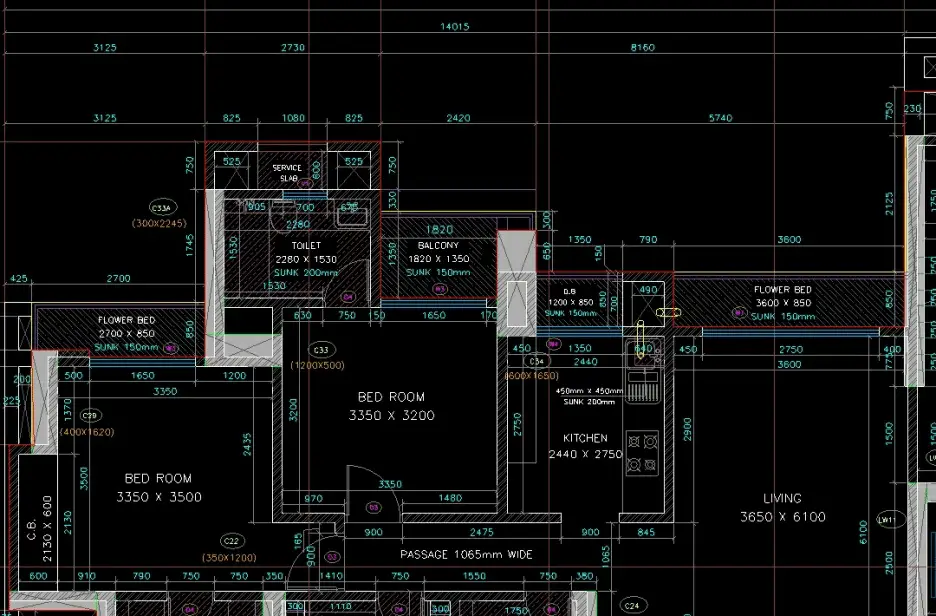
8)Service ducts and shafts
Service ducts and shafts are not payable. So we need to run a PL along all the ducts and determine their areas separately. Then we deduct these areas from the typical floor area.
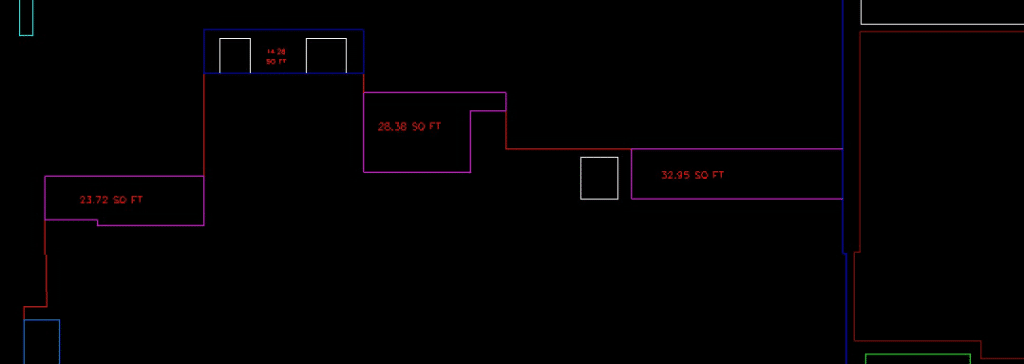
9)Elevation features
Elevation features if exceeding 600 mm above the building line need to be considered for 100% payment. In this example, the elevation features have cut-outs in them. If the area of these cut-outs is less than 0.5 m2 then we need not deduct the area of the cut-out from the elevation feature and take the feature as a whole.
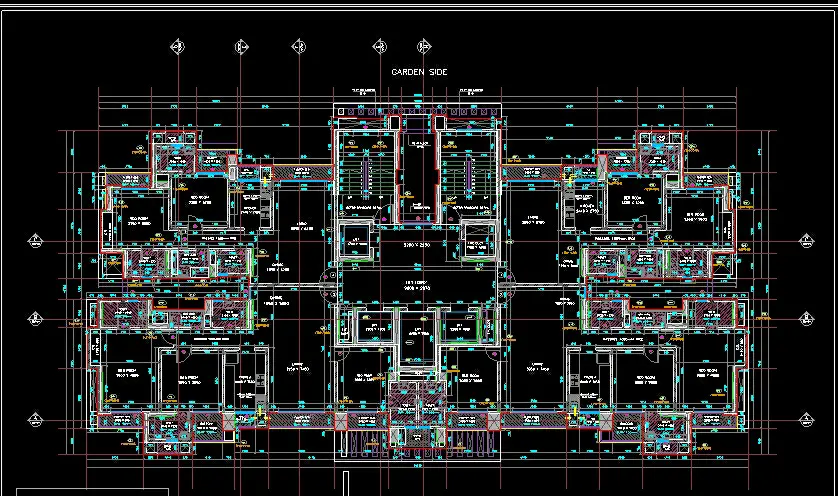
Overall the drawing of the PL looks something like this
How to calculate the built up area in the excel sheet.
Next, we prepare an excel sheet wherein we calculate the area of different features and add them up, in the end, to arrive at the total built-up area.
1) Typical floor
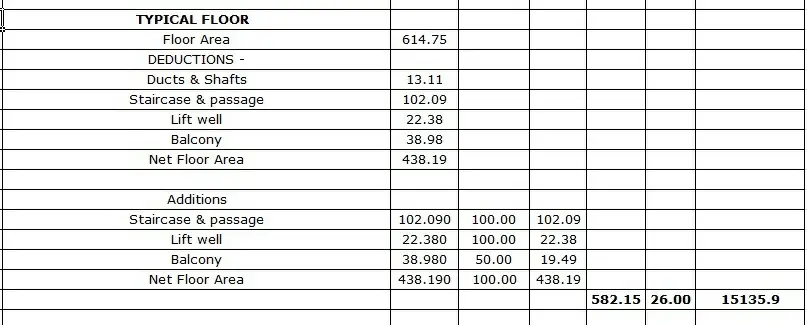
Initially we had run the PL along the entire periphery of the typical floor. In that we had also included a staircase, lift lobby and lift shafts. As these areas are 100% payable as per the contract conditions in this example we will include them in the built up area calculations. We only have to deduct the area of ducts and shafts and the 50% area of balconies.
Floor area = 614.75 m2
Deductions
Area of ducts and shafts = 13.11 m2
Area of balconies (50%) = 19.49 m2
Net floor area (for 1 floor) = 614.75 – 13.11 – 19.49 = 582.15 m2
A)For 26 floors, net floor area = 582.15 x 26 = 15135.9 m2
(We have considered only 26 floors as typical as there are 6 floors with refuge flats and we will calculate their area separately)
2) Refuge flat
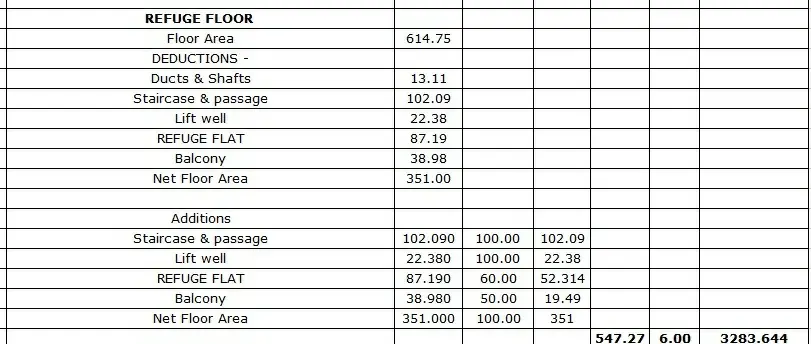
In this step we need to run a PL along the periphery of the refuge flat/area. After knowing the area through properties we need to only consider 60% for the payment.(As per terms of this contract).
Floor area = 614.75 m2
Deductions
Area of ducts and shafts = 13.11 m2
Area of balconies (50%) = 19.49 m2
Area of refuge flat = 87.19 m2
Additions
Area of refuge flat (60%) = 52.31m2
Net floor area = 614.75 – 13.11 – 19.49 – 87.19 + 52.31 = 547.27 m2
B) For 6 floors, net floor area = 574.27 x 6 = 3283.64 m2
3) Basement level

In this level, the area to be considered for calculation is 150% of the actual area as per the contract terms. This provision is due to the construction of the retaining wall which is done in RCC.
Floor area = 627.10 m2
Deductions
Area of ducts, shafts, cut-outs = 16.1 m2
Net area = 627.10 – 16.10 = 611 m2
C) Considering 150%, net area of basement = 611 x 1.5 = 916.50 m2
4) Stilt level
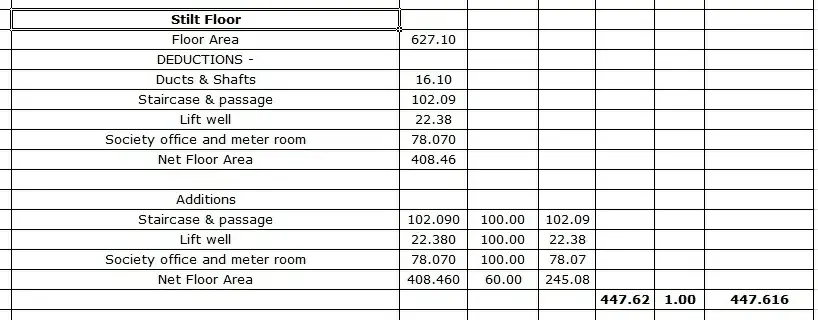
As per contract conditions, only 60% area of the stilt is considered for payment. This is because compared to a typical floor there is no considerable blockwork/ brickwork of this level. However, for facilities like society offices, meter room 100% area needs to be considered.
D) Net floor area at stilt level = 447.62 m2
5) Terrace projections and elevations
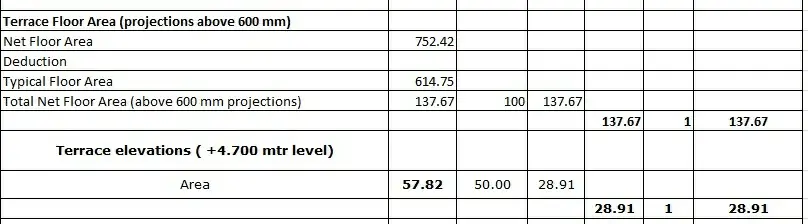
As discussed earlier terrace projections above 600 mm need to be considered for 100% payment.
Area of terrace floor = 752.42 m2
Deductions
Typical floor area = 614.75 m2
E) Net terrace area = 752.42 – 614.75 = 137.67 m2
F) Terrace elevation features = 28.91 m2
6) Upper terrace
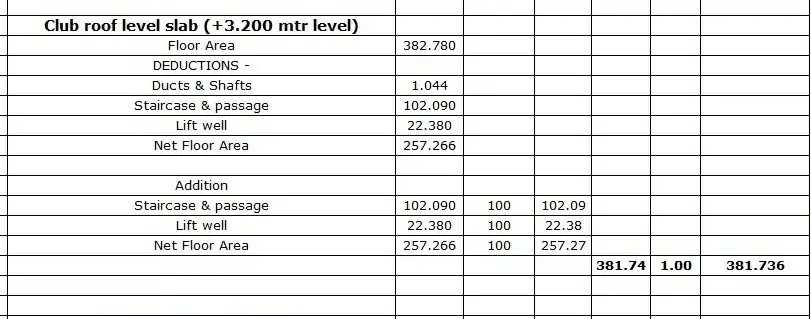
Since the terrace has amenities like gym, multipurpose hall and lift lobby which are covered on top, these have to be considered for 100% payment.
Floor area = 382.78 m2
Deductions
Areas of ducts & shafts = 1.04 m2
G)Net area = 381.75 m2
7) LMR and OHT

The top slab of OHT and LMR should be considered for 100% payment as there are RCC walls separating the tanks and block work in the LMR.
Total area = 235.06 m2
Deductions
Cut-outs for manhole = 0.81 m2
H) Net area = 235.06 – 0.81 = 234.25 m2
8) Elevation features
As mentioned above the elevation features above 600 mm the building line need to be considered for 100% payment and cut-outs less the 0.5 m2 need not be deducted. By repeating the above procedure we worked out the area for elevation features.
I) Area for elevation features = 470.36 m2
Now we just have to add the areas of all the features.
Total built up area = A + B + C + D + E + F + G + H + I
= 21036.60 m2
Converting in sq ft we get
Total built up area = 21036.60 x 10.76
= 226353.82 ft2
Hope you have understood and learnt, How to calculate built-up area

Do we consider last floor terrace area also for contractor payment
And what about parking pit percentage